Note: If you are using the professional version of BurpSuite you can build an entire site map very very quickly even if it has thousands of resources and 404 errors, 500, etc etc (due to unauthed permissions). Visually it can be easier and also you may have unexpected results when requesting a resource you shouldn't have permissions to. This is why I do this.
Overview:
Basically I use the output of DirSnatch (minus the URL) as a payload for BurpSuite Intruder. I start intruder running that payload and because it is forwarding to the second instance of Burp, you will see the target tab fill up very quickly if you are using the professional version. Slower for the free version (not threaded).
So, I've already spidered a site and created a payload file (as an example). Here is what a payload for something like sourceforge.net would look like.
Then I send a request for simply http://sourceforge.net and intercept that request with burp. When the request is intercepted (in the proxy tab) Right click and choose "Send to Intruder".
Once the request is in the "Intruder tab", go to the Intruder tab (duh) and clear the payload selector. Add the variable you want to "fuzz" by clicking 'add' on either side of the "forward slash" on the first line. You can leave the "Sniper" attack type in place.

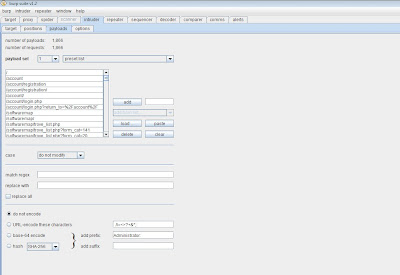
At this point you want to move out of the Intruder > positions tab over to Intruder > payloads tab. Under payload set you will see "load". Once you click load you can load the payload file. It should look like this when you are done. (Notice: choose 'Do not URL encode these characters'). This is important., by default it is enabled and this will cause issues with what we are doing.

We are almost good to go! So scroll over to the comms tab (newer version called options). Scroll down to 'use proxy server'. Enter the IP address (127.0.0.1) and enter the port number (i'm using 8081, cant have two instances of Burp on the SAME machine and BOTH running on port 8080 due to .......ummm....science?) and then DO NOT 'CLICK USE PROXY SERVER' yet anyways :).
Fire up that second BurpSuite instance. Under the Proxy tab > options you will see "Proxy Listeners". Highlight the entry that shows port 8080 and click 'edit'. When the local listener port is populated with 8080 change to 8081. (If you want to run the second burpsuite instance on another machine - uncheck 'listen on loopback interface only' and CHECK 'support invisible proxying for non-proxy-aware-clients') and then..........update. Also, make sure the 'running' column is checked. NOW you can go back to the first instance of BurpSuite and click 'use proxy server'. Should look like this:
Finally, we are ready to start. Back at your first instance of BurpSuite, at the VERY TOP of the BurpSuite program you will see 'Intruder' (not the tab, look even farther up). So, now that you are at the intruder drop down, click start. If you go back to your second burpsuite instance you will notice the target tab has filled up. Great success!


No comments:
Post a Comment