Quick post, I just wanted to give some instructions on using BurpSuite when attempting to proxy traffic coming from the Android Emulator.
In order to do this you will want to use Ubuntu. I've got it working on both Ubuntu 9.04 & 9.10. Don't even try with Windows..........its not worth the headache.
1) Download the Android SDK Here.
2) Extract it somewhere (I chose /home/dojo). Yes I'm giving the example on the web security dojo VM :-)
3) Navigate to the extracted folder. For instance, /home/dojo/android-sdk-linux_86/tools/
4) Once in the tools directory (DO NOT INSTALL AS ROOT) type ./android to start up the SDK install.
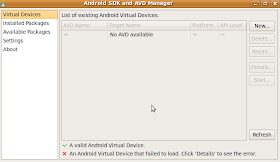
5) At this point you should see the following screen:
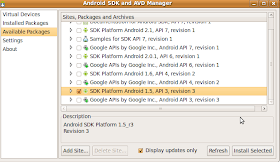
6) Navigate to 'Available Packages' on the left pane, click on the check box and select the following four packages as shown in the figure below.
7) Choose to 'Accept All' and then click install.
8) Now close the dialog box and close the ./android application.
9) Now restart the ./android application and navigate to 'Virtual Devices' on the left pane.
10) Select 'new', give it a name, select 'Target' and choose 'Android 2.1- API Level 7'. Click 'Create AVD'.
11) Start up Burp (this is assuming you have Java installed btw, make sure you do, just "google" installing java on Ubuntu). Change Burp proxy from "Listen on loopback interface only" TO "Support invisible proxying for non-aware clients".
12) Close out the ./android application. In the same directory launch ./emulator. Do so using the following switches as an example
./emulator -avd my_avd -http-proxy http://127.0.0.1:8001 (My Burp instance is running on port 8001)
13) If everything went smoothly, Android booted up and all web traffic is proxied via Burp. You can test by opening the browser.
Note: If you'd like to see the responses coming back to the application ensure you modify your proxy options to intercept server responses if and add the line I've highlighted in the figure below.
Thursday, April 29, 2010
Monday, April 26, 2010
Android Emulators with Android Market
I wanted to be able to view/sniff some traffic from my android phone. Mostly to see how "closed" the gowalla checkin api was (not very).
The first couple suggestions were to connect the phone to wifi and checkin. To do this from the comfort of my own home meant checking in from home and I didn't really want to do that.
Installing the android emulator is pretty straightforward, the only problem is that it doesnt come with the android market or the ability to easily(?) download apps to mess with.
After some googling I found this post:
http://tech-droid.blogspot.com/2009/11/android-market-on-emulator.html
This enabled me to get a working android emulator with android market place.
Go here and download the sdk for whatever system you are using, I'm on ubuntu...
You'll need to download some platforms as the sdk doesnt come with much of anyting by default.
To launch the Android SDK and AVD Manager on Windows, execute
Go to available packages and download sdk package for Android 1.5 or 1.6. I used 1.5
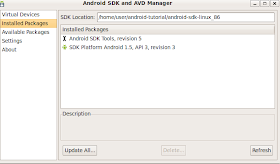
over in installed packages you should see the sdk when its all done.
Go here and download the system image for 1.5 or 1.6
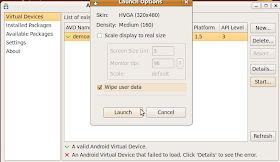
Create an AVD (1.5 or 1.6). populate it how you want, I gave it one of everything on the hardware.
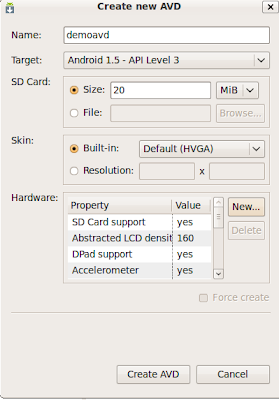
After you create the avd, you should have an avd folder in your .android folder. Something like .android/avd/[avdname]
Copy the system.img file you downloaded from HTC in there.
start that puppy up
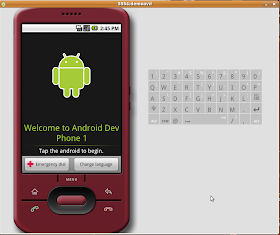
If you went the 1.5 route you are probably getting a slide keyboard to open thing. Hit CTRL+F11 to change the orientation of the phone to "slide it open"
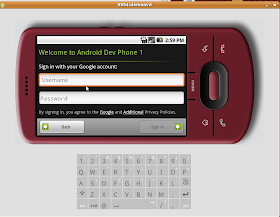
You now have a pretty much fully functional android to muck around with and now any communications with any apps should be sniffable in wireshark.
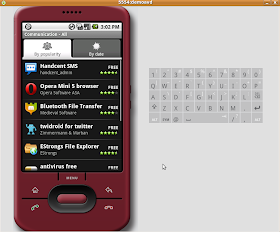
What about the GPS? The debugger gives you the ability to set the GPS manually so you can be anywhere you want to be :-)

additional reading:
https://www.isecpartners.com/files/iSEC_Android_Exploratory_Blackhat_2009.pdf
-CG
The first couple suggestions were to connect the phone to wifi and checkin. To do this from the comfort of my own home meant checking in from home and I didn't really want to do that.
Installing the android emulator is pretty straightforward, the only problem is that it doesnt come with the android market or the ability to easily(?) download apps to mess with.
After some googling I found this post:
http://tech-droid.blogspot.com/2009/11/android-market-on-emulator.html
This enabled me to get a working android emulator with android market place.
Go here and download the sdk for whatever system you are using, I'm on ubuntu...
You'll need to download some platforms as the sdk doesnt come with much of anyting by default.
To launch the Android SDK and AVD Manager on Windows, execute
SDK Setup.exe, at the root of the SDK directory. On Mac OS X or Linux, execute the android tool in the /tools/ 
Go to available packages and download sdk package for Android 1.5 or 1.6. I used 1.5

over in installed packages you should see the sdk when its all done.

Go here and download the system image for 1.5 or 1.6
Create an AVD (1.5 or 1.6). populate it how you want, I gave it one of everything on the hardware.

After you create the avd, you should have an avd folder in your .android folder. Something like .android/avd/[avdname]
Copy the system.img file you downloaded from HTC in there.
start that puppy up


If you went the 1.5 route you are probably getting a slide keyboard to open thing. Hit CTRL+F11 to change the orientation of the phone to "slide it open"

You now have a pretty much fully functional android to muck around with and now any communications with any apps should be sniffable in wireshark.

What about the GPS? The debugger gives you the ability to set the GPS manually so you can be anywhere you want to be :-)

additional reading:
https://www.isecpartners.com/files/iSEC_Android_Exploratory_Blackhat_2009.pdf
-CG
Wednesday, April 14, 2010
Buby.kicks_ass? => true
----
This post got lost in the move back to blogger domain, its probably outdated, im sure tebo doesnt support any of the code... but i've been asked for it before and i found it on someone's evernote
-CG
----
This post got lost in the move back to blogger domain, its probably outdated, im sure tebo doesnt support any of the code... but i've been asked for it before and i found it on someone's evernote
-CG
----
Buby.kicks_ass? => true
Wed, 04/14/2010 - 06:25 by tebo
Buby combines two things I use on at least every web application penetration test, if not every penetration test. Burp and Ruby.
I will assume you are familiar with both. If you aren't familiar with Burp, it's the best money you'll spend on a security tool in my opinion. So go get it, install the PortSwigger cert, tweak your config and get to work. See the end of this post for some operational Burp references.
Buby was widely introduced in the Blackhat USA 09 presentation "Ruby for Penetration Testers" by Matasano Security and is available thanks to the BurpExtender API by PortSwigger and some pretty Ruby by Eric Monti.
Depending on your platform, Buby and some of it's sample dependencies can quite literally be a pain in the ass to install, as in you could be in your seat trying to resolve dependencies for a portion of your day, so assuming you've got it running on your platform, let's talk about some of the use cases.
We could all use a little more interaction with the application under test and a scripting capability is the first thing that comes to mind. Whether it's manually scripting out a login request or application workflow to reach deeper parts of the app or surgically manipulating requests to evade filters or demonstrate a particular attack vector, every test is going to include some component that needs to be handled more interactively than you can do with just a big app scanner. Some common (trivial, fictional, broken, crude, etc.) cases...
- Mining and aggregating parameter values or server responses to a certain page is a no brainer.
faces = [] $burp.with_proxy_history do |req| return unless $burp.in_scope?(req.url) parms = $burp.parameters(req.req_str) parms.collect.each {|x| faces << x[1] if x[0] == "javax.faces.ViewState" } end- Harvesting embedded application paths and feeding them to the Burp spider
exp = /Js\.getView\ / $burp.search_proxy_history(nil,exp) do |view| return unless $burp.in_scope?(view.url) view.rsp_str.each_line do |line| url = "#{view.protocol}://#{view.host}:#{view.port}/" $burp.send_to_spider(url + line.split("=")[1]) if line =~ "Js.getView" end end- Sick Burp's active scanner on requests with several insertion points
# LHF - Throw the kitchen sink at anything that gives you the stink-eye hist = $burp.get_proxy_history hist.each do |req| return unless $burp.in_scope?(req.url) if $burp.parameters(req).length >=3 then $burp.active_scan(req.rhost, req.rport.to_i, false, req.req_str) end end- Burp's active scanner conducts tests and
reports on a limited number of issues in detail and Buby is ideal for
manually reproducing issues found by other tools. Pick your poison when
it comes to Ruby http client APIs (Mechanize and rbkb-httphave been convenient for me) and crank out those PoCs.
Because you're a hot shot application tester, perpetratin some perpetual POST penetration and strokejacking the sauce out of all those users (seriously?), you should have a ton of findings data in your proxy history. The pages and parameters that are affected by each issue are typically the meat of the report findings and will be details that the client will require to begin remediation. Buby (via Burp) provides a hook that is run whenever Burp's scanner reports an issue (Ref) and allows you to tap into all of the data that goes into Burp's scanner reports including the offending request/response messages and rememdiation details where provided by Burp.
Inevitably you will have issues that Burp does not report on, for example: I have ported some of the passive checks and good work done by the Watcher team, into Buby http message hooks to passively detect a couple of the same issues. I also route larger application scanners through Burp so I can send the issues that they find to Burp's Repeater tool and manually verify or debug the issues and not have to open up that tool again when I want to look at the report.
In order to collect these issues and work fluidly in Burp, I wrote a very simple Module to collect the information that Burp's scanner reports on in real-time and log it to a Sequel database and a helper method for the Buby class so that you can quickly flag your own issues during the test and log them to the database with all the detail that is in the offending request and response.
I find the issues database useful whether you don't launch Buby interactively and just want it to catch Burp's scanner issues, or you can use it offline with a state file and parse the proxy history with your passive check API or if you use it inline to route other tools through Burp and reproduce and flag their issues to the database for repeatability and verification.
I won't highlight the code inline but I have put my Buby rc file which has a bunch of dumb stuff in it (named BubyTrap ;])here and the module here. The are comments in both that demonstrate some of the usage. If you have any comments or feedback or if you can't figure it out just email me here at AR.
Bonus: Check out the presentation at Blackhat EU this week that (I think) mentions Buby
Cheers,
Tuesday, April 13, 2010
Decompiling Jar Files
just some notes for later on how to decompile a jar file
first unzip the .jar
cg$ unzip javatest3.jar
Archive: javatest3.jar
creating: META-INF/
inflating: META-INF/MANIFEST.MF
inflating: SiteError.class
inflating: evil.class
...
from there use jad to decompile
cg$ ./jad -r -ff -s java javatest/SiteError.class Parsing javatest/SiteError.class... Generating SiteError.java
thats it, now you can read the code.
Monday, April 12, 2010
Ruby OptionParser Library
I've spent way too much time dealing with a challenging situation while using Ruby's OptionParser class and I wanted to give the solution that I found because maybe one day someone else who is beating their head against a desk will stumble on this.
I created a -u, --username switch for the CLI:
Code Snippet:
and called it (for purposes of testing) by
options = OptparseExample.parse(ARGV)
So, the only change here was that I added USERNAME (could be any string you wanted)........basically I thought the "on" method chose the parameters via comma separation like any normal parameter iteration. Turns out I was wrong. Total and utter weirdness.
With that I am going to go bandage my head :-)
I created a -u, --username switch for the CLI:
Code Snippet:
opts.on("-u", "--username", "Enter your e-mail username") do |u| options[:username] = u
end and called it (for purposes of testing) by
puts options[:username]
Now the problem is I wouldn't receive the actual string value that followed the -u or --username switch back.
So -u cktricky came back either nil or true........not much of a help.
After hours of confusion, literally hours, and although I feel pretty ignorant right about now I am going to tell you what the problem was..........(highlighted the change)
opts.on("-u", "--username USERNAME", "Enter your e-mail username") do |u| options[:username] = u
end So, the only change here was that I added USERNAME (could be any string you wanted)........basically I thought the "on" method chose the parameters via comma separation like any normal parameter iteration. Turns out I was wrong. Total and utter weirdness.
With that I am going to go bandage my head :-)
Monday, April 5, 2010
Network Time Protocol (NTP) Fun
@hdmoore released a new auxiliary module a few days ago that went along with his NTP research he has been doing.
And when you run the module, it looks a bit like this:
Other neat shiz...
Sensepost put out a cool post talking about some of the other neat queries you can do using the ntp tools.
http://www.sensepost.com/blog/4552.html
Of course if you just want to do the monlist yourself you can...
Still Interested?
http://www.ntp.org/documentation.html
msf auxiliary(ntp_monlist) > set RHOSTS time.euro.apple.com

RHOSTS => time.euro.apple.com
msf auxiliary(ntp_monlist) > info

    Name: NTP Monitor List Scanner
 Version: 8432
 License: Metasploit Framework License (BSD)
    Rank: Normal

Provided by:
hdm

Basic options:
Name       Current Setting      Required  Description
----       ---------------      --------  -----------
BATCHSIZE    256                  yes       The number of hosts to probe in each set
CHOST                             no        The local client address
RHOSTS       time.euro.apple.com  yes       The target address range or CIDR identifier
RPORT        123                  yes       The target port
THREADS      1                    yes       The number of concurrent threads

Description:
Obtain the list of recent clients from an NTP server

msf auxiliary(ntp_monlist) >
And when you run the module, it looks a bit like this:
msf auxiliary(ntp_monlist) > run

[*] Sending probes to 17.72.255.11->17.72.255.11 (1 hosts)
[*] 17.72.255.11:123 86.138.33.93:56042 (17.72.255.11)
[*] 17.72.255.11:123 188.192.151.225:52210 (17.72.255.11)
[*] 17.72.255.11:123 81.167.222.18:36866 (17.72.255.11)
[*] 17.72.255.11:123 89.247.73.227:63929 (17.72.255.11)
[*] 17.72.255.11:123 80.39.165.55:123 (17.72.255.11)
[*] 17.72.255.11:123 82.19.218.58:123 (17.72.255.11)
[*] 17.72.255.11:123 82.123.121.154:123 (17.72.255.11)
[*] 17.72.255.11:123 90.207.190.29:123 (17.72.255.11)
[*] 17.72.255.11:123 193.52.24.125:38377 (17.72.255.11)
[*] 17.72.255.11:123 91.10.239.87:64361 (17.72.255.11)
--SNIP--
[*] 17.72.255.11:123 89.241.98.89:27213 (17.72.255.11)
[*] Scanned 1 of 1 hosts (100% complete)
[*] Auxiliary module execution completed
msf auxiliary(ntp_monlist) >
Other neat shiz...
Sensepost put out a cool post talking about some of the other neat queries you can do using the ntp tools.
http://www.sensepost.com/blog/4552.html
Some quick research into NTP(from ww.ntp.org) revealed that NTP servers allow you to perform a bunch of commands that are secondary to time keeping. You can easily play with these using the ntpdc client program eg. 'ntpdc target.ntp.server'. Some of these commands include:
- listpeers - List the peers(NTP servers) for the time server
- showpeer - Give time keeping info about a specific peer time server
- peers - List peers and some basic time keeping info
- sysstats - Info regarding ntp daemon itself
$ ntpq -c readvar time.euro.apple.com
assID=0 status=0684 leap_none, sync_ntp, 8 events, event_peer/strat_chg,version="ntpd 4.2.2@1.1532-o Mon Sep 24
01:42:27 UTC 2007 (1)", processor="i386", system="Darwin/9.6.0", leap=00, stratum=2, precision=-20, rootdelay=0.682, rootdispersion=10.719, peer=8126,
refid=17.72.133.54, reftime=cf648929.538400d4  Mon, Apr  5 2010 12:07:05.326, poll=7, clock=cf648a97.2560d91c  Mon, Apr  5 2010 12:13:11.146, state=4, offset=0.149, frequency=43.608, jitter=0.058, noise=0.041, stability=0.000, tai=0
$ ntpdc -c peers time.euro.apple.com
remote           local      st poll reach  delay   offset    disp
=======================================================================
*time1.euro.appl 17.72.255.11     1  128  377 0.00069  0.000155 0.07887
=time2.euro.appl 17.72.255.11     1  128  377 0.00061  0.000177 0.08919
=17.254.0.49     17.72.255.11     1  128  377 0.14996  0.000237 0.06696
=TrueTime.asia.a 17.72.255.11     1  128  377 0.31990 -0.000027 0.04962
=A17-106-100-13. 17.72.255.11     2  128    0 0.17369  0.007904 3.99217
+time4.euro.appl 17.72.255.11     2   32  376 0.00015 -0.000151 0.04303
$ ntpdc -c listpeers time.euro.apple.com
client    time1.euro.apple.com
client    time2.euro.apple.com
client    17.254.0.49
client    TrueTime.asia.apple.com
client    A17-106-100-13.apple.com
sym_active time4.euro.apple.com
Of course if you just want to do the monlist yourself you can...
$ ntpdc -c monlist time.euro.apple.com
remote address          port local address      count m ver code avgint  lstint
===============================================================================
94.96.201.223.dynamic. 50951 17.72.255.12           5 3 4      0      0       0
static-86-51-114-108.m   316 17.72.255.12          25 3 4      0      0       0
207-38-154-68.c3-0.ave 40311 17.72.255.12           7 3 4      0      0       0
62-177-171-130.dsl.bbe   501 17.72.255.12           1 3 4      0      0       0
bb6a37ee.virtua.com.br   123 17.72.255.12           1 3 4      0      0       0
p4FC7545E.dip.t-dialin   123 17.72.255.12           1 3 4      0      0       0
--SNIP--
Still Interested?
http://www.ntp.org/documentation.html
LearnSecurityOnline Advanced Penetration Testing Course
Everyone that knows me knows that I'm a huge LSO supporter. I wouldn't be where I am today without everything I learned from Joe and LearnSecurityOnline.
He let me get a preview of his new Advanced Penetration Testing (APT): Pentesting High Security Environments course.
The syllabus is available here:
http://www.learnsecurityonline.com/component/content/article/3-admin/222-apt
I got to look at a good chunk of the labs and its top notch training, plus you get it live from Joe who is by far one of the best instructors out there.
Of particular interest to me is the attacking from the web section:
Course Dates
Course dates are 17th - 21st May 2010 Greenbelt Maryland
http://www.learnsecurityonline.com/component/content/article/3-admin/222-apt
2 Day version at Brucon 22-23 September 2010
http://2010.brucon.org/index.php/Training_1#description
He let me get a preview of his new Advanced Penetration Testing (APT): Pentesting High Security Environments course.
The syllabus is available here:
http://www.learnsecurityonline.com/component/content/article/3-admin/222-apt
I got to look at a good chunk of the labs and its top notch training, plus you get it live from Joe who is by far one of the best instructors out there.
Of particular interest to me is the attacking from the web section:
Attacking From the Web
1. XSS to command-shell
2. SQL Injection to command-shell
MS-SQL
MySQL
Oracle
3. File Handling to command-shell
File Upload to command-shell
RFI to command-shell
LFI to command-shell
Course Dates
Course dates are 17th - 21st May 2010 Greenbelt Maryland
http://www.learnsecurityonline.com/component/content/article/3-admin/222-apt
2 Day version at Brucon 22-23 September 2010
http://2010.brucon.org/index.php/Training_1#description


